Sunday, March 11, 2012

Picture Frame

I used an old frame that was sitting around my house. Using hanging wire (25 gauge) and a staple gun I stapled wire across the frame. 
I used clothes pins to keep the pictures on the wire. I took scrapbook paper, cut it into 1 centimeter strips and glued the paper to the clothes pins. 
TA DAA!! All done!

Tin Can Craft

I used large tin cans, spray painted them white (inside too). Using scrapbook paper and mod podge I adhered the paper to the can. After it was dry I put ribbon around the can. I used tags I made with my Cricut to label what was in each can. 

Wednesday, February 1, 2012

Birthday Martini

Birthday Cake Martini
1.5 ounces vanilla vodka
1.5 ounces cranberry juice
1/2 ounce champagne
Rim glass with Sprinkles (cake frosting helps to make them stick). Combine vodka and cranberry juice in an ice shaker, half-filled with ice cubes. Shake well. Strain into glass. Top with Champagne. Drop in cherry. Enjoy!

Valentine's Day Wreath

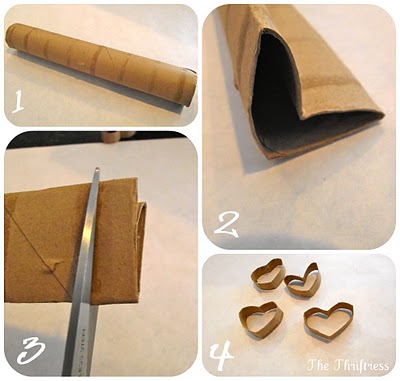
~Valentine's Day Wreath made out of paper towel rolls~

1. Save up two paper towel rolls.
2. Flatten out the tube and then invert one side so you have a heart like shape.
3. Cut the tube into roughly equal parts.
4. Round out the sharp points so you have nice heart shaped pieces.
5. Spray the cut out heart pieces with spray paint of choice.  While the paint is still wet liberally apply glitter.
6. Use hot glue to piece together wreath.
7. Adjust as you glue so that you have a round wreath shape when finished.

This was the original prototype from www.TheThriftress.com but I only did one circle of hearts and it was very flimsy and I knew if I did a second circle of hearts it would weigh down the wreath even more and make it sag. So I altered it a bit and came up with this solution:


I tied pieces of red and white ribbon around every two hearts.

The original paper towel Valentine's Day wreath tutorial can be found here:

Monday, January 30, 2012

Fishing Scrapbook Spread

Finally had time to scrapbook!!! 

Altered Wooden Frame

I love buying $1 wooden frames from Michael's Craft Store. You can costumize them as much or as little as you want. My cousin's birthday was coming up so I decided to make her a quick frame.
Supplies:
  • Mod Podge
  • Wooden Frame
  • Chipboard letters
  • Glitter
  • Scrapbook Paper
  • Brads
  • Fake flowers
Use Mod Podge to glue and seal the paper to the frame. This gets pretty tricky but it works really well once the Mod Podge is dry. Once the Mod Podge is dry then start decorating the frame however you want!

Coastal Sign

One day while browsing the local Goodwill store I got the idea to look for wooden plaques or wooden signs. I didn't care what the sign said because I knew I could sand it off and repaint it. This sign had something dumb about using a microwave to cook. I sanded everything off, repainted it (I got the straight lines from using painter's tape). When the paint was dry I used sandpaper to give it a "worn" look. I used my Cricut cutting machine to make the letters. Using matte finish Mod Podge I glued and sealed the letters on the wood and DONE!