Saturday, August 31, 2013

Paint Stick Coastal Flag

I got this creative idea from Crafts By Amanda blog. She has a wonderful step-by-step tutorial on how to make this. My advice to you is to use 5 gallon paint bucket stir sticks and not the regular paint sticks. 
http://craftsbyamanda.com/2013/05/paint-stick-beach-flag.html

Here's the exact paint used in this craft. The oyster beige was used on the starfish.
This was a fun and basically free craft! I live in Florida so the starfish are readily available. I used hot glue to secure the sticks together by gluing a shortened paint stick across the backs of the sticks. Used twine to make a hanging loop. Done!

Sunday, August 18, 2013

Bookcase re-do

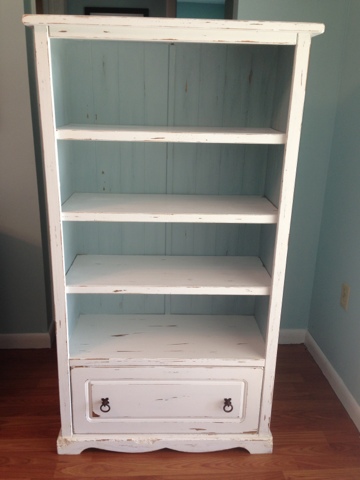
I found this solid wood bookcase on Craigslist for only $25! It's so difficult to find solid wood furniture these days so when I find a piece for a good price I grab it! 
I used a high hiding white paint:
I used some leftover blue paint for the inside of the bookcase. 
Always let paint dry for at least 8 hours (overnight is preferred). Then take a sanding sponge to the piece. I used a polyurethane matte sealant. 


Saturday, August 10, 2013

Pallet Wall Art

I love all the pallet transformations on Pinterest right now. I don't have room for a pallet table or anything big like that so j made some pallet wall art for my house. (I didn't hang all these in my house, I gave some to family and friends).
My wonderful and helpful hubby took a pallet apart and nailed them all together using a slab of wood. Here's what that looks like:
Then I stained the wood using a dark walnut stain:
After staining the wood: (staining is a very messy and sticky job, be sure to wear gloves)
Helpful hint: draw your design on a large piece of cardboard, cut it out and trace it on the pallet wood. 

I drew the seahorse on using a chalk pen (if you mess up you can wipe off)
I used a high hiding white paint. It took two coats. 
Here's a few others I've done: 
Tarpon: 
Crab:
Other seahorse:
Teal seahorse I made for a friend:
Gecko:
Jellyfish:
Mermaid:
Shark:


My tip is to screw in heavy duty picture wire into the back of the board:
You don't have to put a sealant or top coat on because the wood stain has it already built in. Plus it's a pallet, it's used to being in the rain and outside.


Headband Holder

I love my headbands but hated that they got smashed in my hair accessory drawer. I think I've seen this headband holder idea on Pinterest. 
I found a piece of scrapbook paper in my stock of paper and went for it! I used glossy Mod Podge to glue and seal the paper on the oatmeal container. 
I stuffed my elastic headbands inside the container and put my regular headbands on the outside. The only down fall is that this container takes up a lot of room but I think it's worth it because I spend a good amount of money on hair accessories and I'd like to keep them in good shape. 

Thrift Store Find Makeover

The second I laid eyes on this seahorse figurine at Goodwill I knew I would use my handy dandy spray paint collection to make it fit my coastal house decor perfectly! Two coats of blue spray paint later and it's done! I love it! 

Monday, July 22, 2013

Shabby Chic Bedroom Set

I helped a friend re-do her bedroom furniture. I'm super bummed because I didn't get a before picture. The original furniture was white and it had an almost laminate texture to the whole thing, which worried me because I've only worked with solid wood in the past. I attempted to sand it down, but quickly realized I wasn't getting anywhere with it because it was laminate furniture. I was nervous because I didn't know how the distressing part would turn out or how well the paint would hold onto the laminate.  
As you can see we painted the tops of the furniture brown and the base of the dressers a blue/turquoise. We painted the knobs and handles the same brown color as the top. Next came the part I was most nervous about.... Distressing. This was a stop and go process because sometimes whole strips came off from the drawers due to the laminate. There were times we had to repaint a drawer because too much paint came off. We used matte Shellac to seal it, putting three coats on the tops of the furniture and two on the drawers and sides. I think the furniture turned out great!!! 

Inspired by this picture:
 
 We were inspired by this picture above. Those pieces were solid wood, but I think we came pretty close to achieving the same look. For more information on the above picture click here.

Shabby Chic End Table

I'm always looking for solid wood pieces that I can buy for cheap and re-do. I got this end table off Craigslist for $20. It's solid wood and very heavy.
After sanding it with an electric sander (which I have to say is the best invention in the world) I started painting it. I used eggshell paint that I had lying around the house from previous paint jobs. I let it dry overnight and sanded it using a fine grit sandpaper block (also a great invention). I sealed it using a shellac in matte that I bought at Lowes. I love how it turned out. I gave it to my friend as a housewarming gift for her beach-inspired apartment.